Showing posts with label arcade. Show all posts

Tuesday, May 22, 2012

Making of an Arcade Frontend - Part 4

Previous entries:
Prologue
Part 1
Part 2
Part 3

Last part I talked about some boring math used to create a pretty rotating list of games. This time I'll be showing some more code. The goal today will be to have a smooth transition between game titles on the list.

So, here's what we're starting with. The code to position and draw the rotating games menu. No special effects and no transitions, the selected game is in the middle. Don't forget to read the comments since they cover most of the "clever" parts of the function.

# NOTE: These functions are members of a class.
# I've omitted most of it since it's not relevant to the example


def _selectorPos( self, i ):
    # Here's the math that was discussed in the previous blog!
    x = self.radius * math.sin( float( i ) * 3.14159 / float( len( self.selectors ) - 1 ) )
    y = (i - self.selectedIndex) * self.spacing
    return (x, y)

def Draw( self, screen ):
    # Draw the top half of the menu
    for i in range( self.selectedIndex ):
        pos = add(self.center, self._selectorPos( i ))
        # Rect is a tuple of vectors
        # The first is the top left, the second is the bottom right
        rect = (add(self.pos, neg(self.unselectedSize)), add(self.pos, self.unselectedSize))
        self.selectors[i].Draw( screen, rect )

    # Draw the bottom half of the menu
    # Reverse order so items closer to the center are drawn on top of ones further away
    for i in range( len( self.selectors ) - 1, self.selectedIndex, -1 ):
        pos = add(self.center, self._selectorPos( i ))
        rect = (add(self.pos, neg(self.unselectedSize)), add(self.pos, self.unselectedSize))
        self.selectors[i].Draw( screen, rect )

    # Draw the currently selected item, last so it's on top
    pos = add(self.center, self._selectorPos( selectedIndex ))
    rect = (add(pos, neg(selectedSize)), add(pos, selectedSize))
    self.selectors[selectedIndex].Draw( screen, rect )

Notice I've hidden some math away in functions. This makes the purpose of this code easier to discern since it's not buried in a ton of repetitive arithmetic. The functions add and neg are 2D vector addition and negation. Since Python provides tuples as a built in type I used them to represent vectors. This can be bad for performance because every time I do math on vectors a new vector gets created. That means lots of garbage objects for the garbage collector to clean up. Optimization is as easy as replacing tuples with a mutable type and would have no effect on this code since all the real work is hidden in functions. I haven't done so here because it hasn't been an issue.

So if we use this code to display a menu it will display a list of games in a nice circle with the selected game in the middle at one size, and everything else above and below it at a different size. Items further from the center are displayed behind ones closer. This allows items to overlap if I want and still look reasonably good.

Now, if you remember the skeleton I showed in Part 2, I had some code for responding to input. Now it's time to update it to allow the selected game to change. New stuff is in italics

# the main loop!
frameStart = time.clock()
time.sleep( 0.01 ) # XXX: don't want a frame time of 0 when starting
while True:
    frameTime = time.clock() - frameStart
    frameStart = time.clock()
        
    for event in pygame.event.get():
        if event.type == pygame.QUIT or (event.type == KEYDOWN and event.key == pygame.K_F12):
            sys.exit()
        elif event.type == KEYDOWN:
            if not selector.InTransition():
                if event.key == pygame.K_DOWN:
                    selector.Next()
                elif event.key == pygame.K_UP:
                    selector.Previous()
        
    selector.Update(frameTime)
    selector.Draw(screen)
    pygame.display.flip()
    screen.fill( (0,0,0) )

Nothing too surprising I hope! The only really special code here is right after the new KEYDOWN check. The checks simply make sure the person using the launcher can't change the selected game while the selection is in the process of changing. The code for selector.Next and selector.Previous is about the same. It sets a flag in the selector object to make it change selections. The work of changing selections happens in Update and Draw. Update maintains a timer which lasts for about 1/5th of a second. It also stops the timer and changes the selected game once the timer expires. Draw handles positioning everything based on the value of the timer. If no transition is happening the drawing code I showed you at the top is run. Otherwise some different code runs...

alpha = self.timer / self.transitionTime

# Draw the top half of the menu
for i in range( self.selectedIndex ):
    pos = add(self.centre, blend(self._selectorPos( i ), self._selectorPos( i - 1 ), alpha))
    rect = (add(pos, neg(self.unselectedSize)), add(pos, self.unselectedSize))
    self.selectors[i].Draw( screen, rect )

# Draw the bottom half of the menu
for i in range( len( self.selectors ) - 1, self.selectedIndex - 1, -1 ):
    pos = add(self.centre, blend(self._selectorPos( i ), self._selectorPos( i - 1 ), alpha))
    rect = (add(pos, neg(self.unselectedSize)), add(pos, self.unselectedSize))
    self.selectors[i].Draw( screen, rect )

# Draw the old selection
pos = add(self.centre, blend(self._selectorPos( self.selectedIndex ), self._selectorPos( self.selectedIndex - 1 ), alpha))
rect = (add(pos, neg(blend(self.selectedSize, self.unselectedSize, alpha))), add(pos, blend(self.selectedSize, self.unselectedSize, alpha)))
self.selectors[self.selectedIndex].Draw( screen, rect )

# Draw the new selection
pos = add(self.centre, blend(self._selectorPos( self.selectedIndex + 1 ), self._selectorPos( self.selectedIndex ), alpha))
rect = (add(pos, neg(blend(self.unselectedSize, self.selectedSize, alpha))), add(pos, blend(self.unselectedSize, self.selectedSize, alpha)))
self.selectors[self.selectedIndex + 1].Draw( screen, rect )

There's quite a bit of new stuff here. There are a bunch of calls to a new function "blend." What it does is create a new position that's "alpha" percent between two positions. 0% is at the first position, 100% is at the second position, 50% is right between the two. There are three variations on how blend is used.

blend(self._selectorPos( i ), self._selectorPos( i - 1 ), alpha)
This makes the items rotate upward. The top item goes offscreen and disappears, the item below the selection becomes the selected item and a new item slides onscreen from the bottom.
blend(self.selectedSize, self.unselectedSize, alpha)
blend(self.unselectedSize, self.selectedSize, alpha)
These make the old selection go from the size it has when selected to the size of everything else and the new selection go to its selected size.

Tuesday, February 21, 2012

Making of an Arcade Frontend - Part 3

Last part of this series I talked about how I started coding up the arcade frontend based on translating the features I wanted into tasks the program has to do. One thing I want to do when starting any project is work on tasks that provide the most benefit for the least effort. The strategy I used in the previous part was to pick a task that was needed for a lot of features to work (finding information on games to launch.) The final result is a nice skeleton which I can build the launcher around.

Today I'm going to talk about a second method of getting a lot of visible bang for your programming buck. That is by finishing tasks for the most visible features in the program. In short, make the user interface before other stuff. The first method (finding common tasks and doing them first) is roughly the same as bottom up development for those into jargon. This method of building programs is normally known as top-down development.

If you don't get the names try to imagine a program being like a cake. Top-down means starting with the icing and decorations while bottom-up means starting with... well... with the bottom. Both methods have their gotchas. building from the bottom up tends to mean you have something unappetizing until you're all done your work. But, building from the top down means you have a hollow shell made of icing and fondant. It looks complete and appetizing but its missing everything that makes it a cake.

With that in mind I prefer to do both at once. This way of doing things doesn't translate very well into my cake analogy. The closest idea is to build a cake one slice at a time. What you get is kinda tasty, but obviously incomplete. You end up with something that can be released very quickly that gradually improves until you're done.

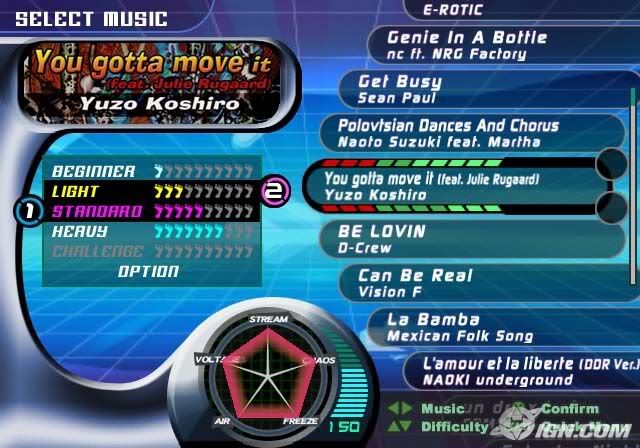
Anyway; enough about cake. Let's talk about the arcade frontend... I'm going to create a graphical menu to pick out a game to start. I drew inspiration mainly from the rotating song menu in Dance Dance Revolution. Playable games will show in a semicircle with the selected game in the middle at a larger size than the others. selecting a new game rotates the menu and you can rotate forever in either direction.


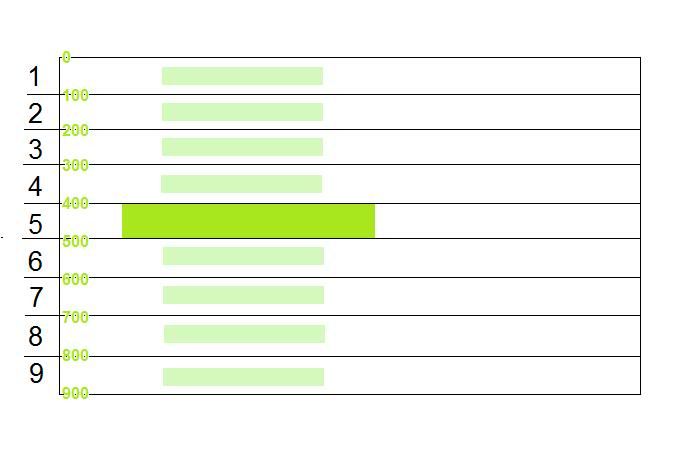
To get the right look requires a bit of math. placing the titles vertically is simple... sort of. Dividing the screen's height by the number of visible items will give you the amount of space each item can take. If you take that number and halve it you get the distance to the center of each space that can be used.

Now, I'm guessing a few people are asking why I need the center of the space where each item goes at all since PyGame draws images positioned at their top left. The reason is that the center of each item will stay the same no matter how large or small the item gets. It's very easy to calculate the top left of the image by subtracting half of the image's size from its center. It's not so easy to calculate the top left of the image relative to the top left of the  The image below shows this better than words can.
Another thing to note is that I'm using an odd number of games in the visible part of the menu. This way there's one "middle" game which is the selected game and an even number of other games around it. Having an even number of games would result in the selected game being off center which looks ugly.

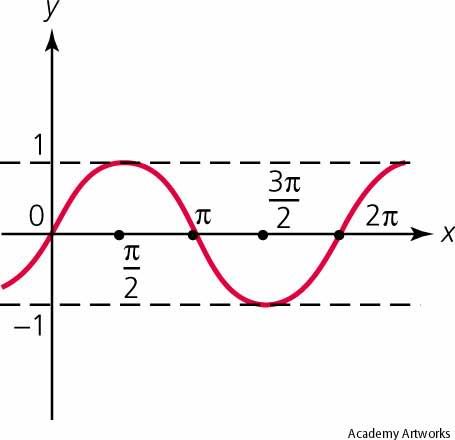
Placing the titles horizontally requires a bit more math knowhow but not much. If you remember your trig class you might recall that the sine function looks like a smooth set of waves like this.


Source: http://images.yourdictionary.com/sine-curve

In programming the sine function usually uses a unit called radians. Radians are how mathheads measure angles. You can do some cool tricks with them once you get it. The important part is that half a circle (180 degrees) is equal to Pi (3.14159...) radians. The cool part is that sine between 0 and Pi radians looks exactly like half a circle. In fact the value of sine at any angle matches how far you are from the center of a circle vertically at that angle.

With that all that needs to be done is to multiply the item number by Pi then divide it by the number of items that are to be visible plus two, put that number into a sine function, then multiply the result by the radius of the circle. Why plus two? In order to support spinning between games an extra game is to appear offscreen and slide onto the screen when changing selection. If we don't take these two items into account games coming onscreen from the top or bottom will wobble to the left or right.

Here's the result of all that math

Not too bad eh?

Next entry I'll be showing some code and talking about how to handle transitions between titles. I'll also show you the code that this entry produced as well.

Tuesday, January 10, 2012

Making of an Arcade Frontend - Part 2

If you haven't read them yet check out the prolog and Part 1

I think it's been a sufficient ahem an excessive time since I've posted last...

During my Christmas vacation I managed to bash out the majority of the features I've wanted to support in my arcade frontend. I had a couple false starts before then. Frustrated, I went with the tried and true "just make the damn thing work" development methodology (aka hacking.)

Well, I didn't build it quite as haphazardly as that. The idea is to translate the project requirements into some minimal functionality that must be created for the project to be considered "working." For a small project like this it only takes about 10-30 minutes of effort. For larger projects it takes longer. Most of the time you'll find some features that are independent of each-other. To get the most bang for your buck your best bet is to start working on some feature that a lot of requirements depend on.

Huh? What?

I'll give an example. This is taken from the requirements list in Part 1 under each requirement is a number of functions that need to be implemented
  • Hide the regular Windows front-end.
    • Using pygame run in full screen mode
    • Leave full screen mode before starting a game, re-enter once the game exits
  • Allow the user to shut down the computer without exiting to Windows
    • Method for responding to user input
    • Method for confirming user action
    • Method for invoking windows shutdown
  • Allow an administrator to exit to windows
    • Method for responding to user input (key-mapped arcade controls)
    • Clean program shutdown
  • Allow rapid selection and launching of games using arcade controls (not keyboard and mouse)
    • Method for responding to user input (key-mapped arcade controls)
  • Support launching any game/program, not just MAME
    • Scan (something) to create a list of programs that are launchable
    • When prompted launch a program using information from the list
  • Display a preview of the selected game
    • Scan (something) to create a list of images associated with games
    • Method to load images as needed 
  • Display a list of games that can be played
    • Scan (something) to create the list of playable games
    • Method for distinguishing selected game from others
    • Method for displaying available games 
  • Display a marquee for the game... somewhere near the screenshot
    • Scan (something) to create a list of images associated with games
    • Method to load images as needed
  • Everything must have an animation
    • This means needing an endless update/draw loop for objects
    • Need a state machine to indicate whether some transition is occurring and what kind
  • Alter control-key mappings to support games without configurable controls 
    • Method to invoke IPAC-2 programmer with some known configuration
    • Scan (something) to create a list of control configs associated with games  
There are a couple things that pop out:
  • Method to load images as needed
  • Scan (something) to create a list of games and things associated with them
Of those scanning comes up the most and, more importantly, relates most directly to the purpose of the program which is starting games.

For my first crack at this I've decided that (something) will be a directory tree containing files called (game)-launcher.cfg which describe playable games. For the sake of organization, since there will likely be well over 100 files, the config files can be in any directory in the tree.

What do I want to put in the file:
  • The program to start
  • Extra information to pass to the program
  • Controller settings for the game
  • Where to find game's marquee, screenshot and other image files
Now, how do I format the file? I don't want to spend an undue amount of time writing a parser so I could use one of Python's built in parsers. But that still means I need code to convert that to an easily usable datastructure (let's just ignore JSON for now since it slipped my mind at the time) So... how about just making it a Python module. That reduces parsing to one line of code. The file itself simply contains a Python dict with a standardized name and standardized keys.

First the code to scan for config files:
def FindAllLaunchables( startDir ):
    outList = []
    dirList = os.listdir( startDir )
    for dir in dirList:
        checkDir = os.path.join( startDir, dir )
        try:
            if os.path.isdir( checkDir ):
                outList.extend( FindAllLaunchables( checkDir ) )
            elif os.path.isfile( checkDir ) and dir.lower().endswith("-launcher.cfg"):
                outList.append( checkDir )
        except WindowsError:
            pass
    
    return outList

That's it. The function recursively scans all directories under startDir and, if it finds a configuration file adds its location to an output list which the function returns.

This bit of code handles reading the configuration file.

def CreateLaunchers( configFiles ):
    launchers = []
    for launcherConfig in configFiles:
        moduleName = os.path.splitext( launcherConfig )[0].replace( os.path.sep, "_" ).replace( ".", "" ).replace( " ", "_" )
        
        moduleFile = open( launcherConfig )
        try:
            modulePath = os.path.split( launcherConfig )
            module = imp.load_module( moduleName, moduleFile, launcherConfig, ["cfg","rt",imp.PY_SOURCE] )
            launchers.append( config.Launcher( module.LauncherConfig ) )
        finally:
            moduleFile.close()
            del moduleFile
    return launchers

The meat here is the call to imp.load_module. The imp module exposes some of the guts of Python's import statement and is useful for importing arbitrary files as modules. Notice the config.Launcher object instantiation. The Launcher class will be used to carry out the work of starting up a game based on its configuration along with some other stuff.

And that's everything! To finish this initial step I stubbed in some code to start up fullscreen mode and to pick up keyboard input. That code is below and makes up the skeleton which the rest of the program will be built around.

pygame.init()

# load configuration
configFiles = FindAllLaunchables( search, skip )
launchers = CreateLaunchers( configFiles )

# startup sequence
screen = SetScreenMode()
pygame.key.set_repeat( 1000, 200 )
pygame.mixer.init()
things = []

# the main loop!
frameStart = time.clock()
time.sleep( 0.01 ) # XXX: don't want a frame time of 0 when starting
while True:
    frameTime = time.clock() - frameStart
    frameStart = time.clock()
        
    for event in pygame.event.get():
        if event.type == pygame.QUIT or (event.type == KEYDOWN and event.key == pygame.K_F12):
            sys.exit()
        
    for thing in things:
        thing.Update( frameTime )
        thing.Draw( screen )
    pygame.display.flip()
    screen.fill( (0,0,0) )

Whelp, that's all for part 2. I'll have more for you next time! (and since the project is working, next time should be sooner, not later) SetScreenMode isn't all that exciting so I've spared you its details. Notice that with this code we now have the following done.
  • Using pygame run in full screen mode
  • An endless loop to update/draw objects
  • Method for responding to user input (stub)
  • Scan (something) to create a list of games and things associated with them
Not bad for one blog-entry worth of work eh?

Sunday, July 31, 2011

Making of an Arcade Frontend - Part 1

Ah, time to take a break from work and dealing with ASP.NET web applications, continuous integration servers and all that fun (but boring to talk about) crap. Time, for The Making of an Arcade Frontend!

H'okay. So, like any good software project, my arcade frontend needs a plan. And any good plan starts with a set of goals. A bunch of things the frontend is required to do. In other words, software requirements. Woo! Exciting! Sounds like something out of a college software quality course eh? Well, at least a good software quality course would discuss requirements. After all, it's hard to tell whether your software is "right" or "good' if you don't even know what right or good are.

There are a few ways of going about making software requirements. You can write up a paragraph of what you want the program to do. Or you could make a checklist of features. Or you could draw a bunch of pictures. Or you could write a formal SRS document. The choice is yours.

I tend to favor brevity when coming up with goals for my software. It reduces the amount of effort I expend on the requirements stage dealing with contradictory requirements and other general issues. It also helps avoid falling into the trap of writing requirements as a set of instructions on how the program will work; instead of what the program needs to accomplish. If you do fall into the trap of writing a how-to for your program you'll regret it when you find that the design won't work with real code. Good requirements say nothing of how they get achieved. For a large project I tend to go with a short paragraph describing each requirement. A couple sentences does the trick quite nicely. Small projects only really need a set of bullet points. There's no hard and fast rules on what is or isn't descriptive enough for a given project. It really depends on the size of the projects and who is working on it. Practice makes perfect.

So, what are the requirements for my arcade frontend? Here they are.
  • Hide the regular Windows front-end. It should appear as soon as the computer becomes usable.
  • Allow the user to shut down the computer without exiting to Windows
  • Allow an administrator to exit to windows (e.g. to install more games)
  • Support launching any game/program, not just MAME
  • Allow rapid selection and launching of games using arcade controls (not keyboard and mouse)
  • Display a preview of the selected game
  • Display a list of games that can be played. Preferably in a manner that looks pretty (e.g. like how DDR displays its song list)
  • Display a marquee for the game... somewhere near the screenshot
  • Absolutely no hard transitions. Everything must have an animation to go with it
  • Alter control-key mappings to support games without configurable controls 
See, nothing all that complicated at all. So, now that I know what I want to do, I need to decide how to do it. That's for another article.

Friday, July 22, 2011

Making of an Arcade Frontend - Prolog

So, if anybody follows my wife's blog you'll have probably heard that I've been building a MAME cabinet. Now I'm not going to talk about the actual physical construction much. If you're interested in that I took plans for the TaitoRama cabinet from Project MAME as the base. After that I converted the measurements from Metric to Imperial so that I could build it using the tools I have. In the process I also altered the dimensions slightly, increasing the height of the cabinet to exactly 6 feet tall from at the peak.

The assembly is now done enough for me to start the fun part. Trying it out and tuning the UI.

The actual working part is a PC running Windows 7 which I put together for about 700 bucks including the monitor and OS. The overkill hardware means I can run stuff other than just MAME smoothly as long as it works well with a 6 button arcade control setup. (Street Fighter 4 is on my shopping list for this thing.) It works, it runs the games I want but... it's still a desktop PC. It doesn't look like an arcade cabinet, and certainly doesn't work with arcade controls.

I need a frontend to make the cabinet more snazzy. I need something to start up my games that works with the arcade controls, and I need to do something to make the PC look... well... less like a PC. Especially when booting. Every frigging machine out there has the same POST, Starting Windows, Login, Desktop crap; and I don't want to see that when turning on my arcade cabinet.

To do that, I have turned to the intertubes and found two pieces of the puzzle. The first is a simple registry key built into Windows 7. Turning it on enables support for a customized login/logout screen, you will only see it when the PC is turning off but it's a start.

The second piece is a more fun one. It's a program which allows anyone to create a customized animation for when you start up the computer replacing the usual glowy windows logo. It also lets you replace the captions "Starting Windows" and "(C) Microsoft Corporation" In my case I've changed the captions to "Main Screen Turn On" and some random nonsense. The animation is, well, a screen turning on revealing someone you might know. Much more fun.

I haven't found a method to replace the default ASUS POST screen (the image that first appears when the PC turns on) but it should be possible, the OEMs do it after all. However possible firmware hacking can wait, now is the time for getting my games started.

Now there are lots of arcade frontends out there. Many of them even support multiple emulators, which is good. But they all seem to be geared toward running emulators only. Even if they aren't I don't really care, I'm doing this for fun so I'm going to have fun making my own front-end. It will have my own (or my wife's) graphics, and custom made animations plus as much other pizazz as I wish to jam in there.

Also it will let me script in extra behind-the-scenes work for running any game I want. For example, if one game has a rigidly defined control scheme (say, Melty Blood) I can reconfigure the arcade controller's driver to work with that game. So, not only can I play awesomeness such as Contra, DoDonPachi, Donkey Kong and Metal Slug with MAME, I can also play I Wanna be The Guy, Cho Ren Sha 68k, and other non-emulated games.

More details to come.